Host Permissions
The booking system allows you to configure different user roles and permissions for the host application. This enables you to control what actions and data each user can access.
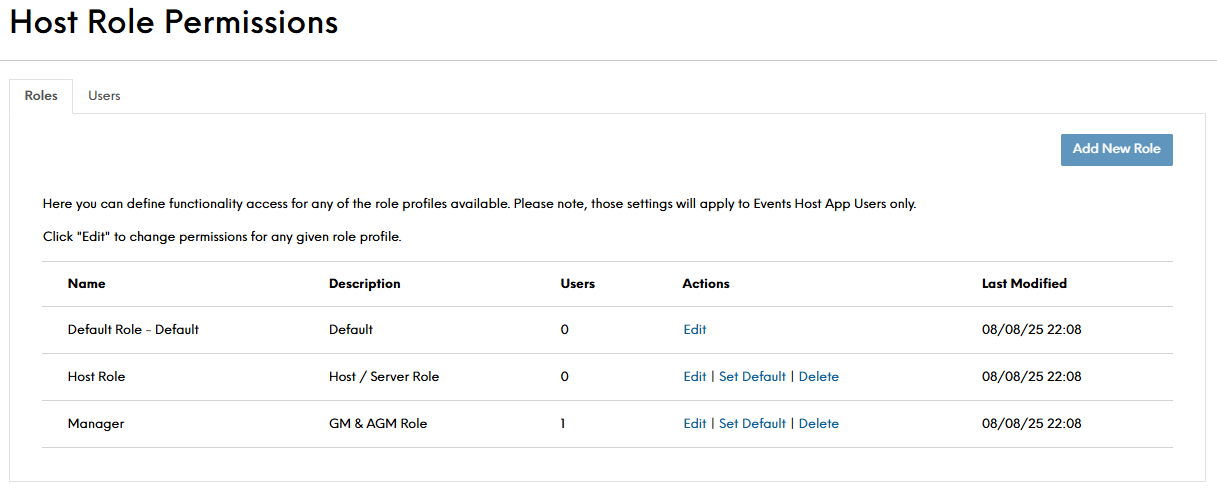
Accessing the Host Role Permission page, you will find the default role, it is automatically created on every estate and assigned to all existing host users, with all permissions enabled to ensure that no user loses access to any part of the system during the initial roll-out. Additionally, this enables those users who do not want to interact with this feature to ignore it altogether - if no new role is created, your users will not see any difference in their access.
Host Permissions Topics
Creating Role Permissions
-
Select the Roles header
-
Click on Add New Role
-
Enter a Role Profile Name
-
Enter a Role Profile Description
Giving the role a name and description can assist you in maintaining your systems
-
Select from the options to define the role permissions
-
Select Assign New User
Select from the list of users, which users you want to have this level of permission
-
Click Save Changes
Assigning Role Profiles to Users
There are 2 ways to assign a user to a profile, and vice-versa
-
The first is available only to Estate Admin users, as this can be done from the role creation screen by clicking "Assign New User" button. A pop-out window will open allowing the Admin to browse all Host users assigned to the Estate, either by scrolling the list or by utilising the search bar
To assign a Host user to the role profile, simply click the box next to the user name to "tick" it, then use the "Add" button - you will see the user added to the "Users" list. On this screen you can also remove the role assignment by "unticking" the user on the list and hitting "Save Changes", users un-assigned this way will be returned to the currently selected default role
-
The second is available to all Admin users (Estate, Company and Site). It can be access via the "Users" sub-tab, where Admins will find a table of Host users currently associated with their Estate. This table lists Hosts' user name, associated site and currently assigned Role Profile. What is more, to make Admins' lives easier each of those columns can be sorted alphabetically and filtered using the search bar
On this screen Admin users can use the dropdown to easily change role assigned for each Host user. There is no need to hit "Save" anywhere on that page, as all role assignments are automatically saved. This will be communicated to the user with a green tick, which appears after a new role has been successfully assigned
Managing Users
When more than the default user role permission exists, you will have options available:
-
Edit - which will open the role creation screen as seen above, allowing user to make changes to the existing configuration
-
Set Default - change the default role to a different one, you will see that the name of the default role is always followed by "Default" for the convenience of the user
-
Delete - once clicked it removes the appropriate role, while moving all assigned Host users to the default role
Host Application Prompts
To ensure that Host users are not confused as to why some of the previously available functionality has been disabled, we implemented a message in Events Host app that appears when the user hovers their mouse cursor over the disabled function. For example, if the ability to edit a booking has been disabled, the Host user will see the below message:
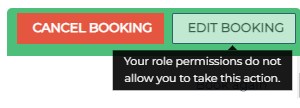
This message is standard for all permissions.
Moreover, the assigned role will display in brackets underneath Host's user name in their account details. This can be found when selecting the option to log out of the Events Host screens.
Field Settings & Information
This level of granular control helps ensure your team members can only perform the actions relevant to their role, improving security and accountability. You can create new roles, assign specific permissions, and then associate individual staff members with the appropriate role.
| Bookings Options | Description |
|---|---|
| Cancel | This setting controls Hosts' ability to cancel a booking by disabling buttons related to cancellation functionality |
| Edit | This setting controls Hosts' ability to edit a booking by disabling buttons relating to edit functionality |
| Manage Tasks | This setting controls Hosts' ability to manage tasks by disabling the buttons relating to Task functionality |
| Message Guests | This setting controls Hosts' ability to message Guest users via Events by disabling relevant text fields and buttons |
| Manage Labels |
This setting controls Hosts' ability to manage labels on a booking by disabling buttons related to Labels functionality |
| Enquiry Options | Description |
|---|---|
| Accept | This setting controls Hosts' ability to accept Enquiries via the Events Host app |
| Reject | This setting controls Hosts' ability to reject Enquiries via the Events Host app |
| Edit | This setting controls Hosts' ability to edit Enquiries via the Events Host app |